Posts

Electronics #3: Setting up the first RAMPS with Klipper

Image
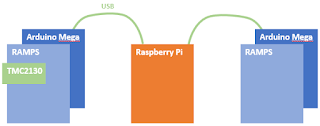
This is part #3 in a list of postings on the electronics of my CEVO. The full list can be found  here . The topic of this list is initial very simple setup of a RAMPS/Arduino with Klipper. Note that further steps comes in later parts and that the photographs shows my test setup, not the final wiring. When talking about the RAMPS board, we usually means the RAMPS 1.4  , which is a quite simple board that is designed to piggyback on an Arduino Mega . Originally is was designed as an 12V board, but most boards can be used more or less directly with 24V following one of the many guides on doing this (see for example here and here ). The original design was made for manual soldering, and most RAMPS boards are variations of varying quality of this, I am however going for the BIGTREETECH Ramps 1.6 , which is a Chinese surface mount design - see a good review here , also read the enlightening comments below the video. I have two of these, and to my unqualified eyes they look to ha...

Electronics #2: Setting up Raspberry Pi with OctoPrint

Image
This is part #2 in a list of postings on the electronics of my CEVO. The full list can be found  here . The topic of this list is setting up a Raspberry Pi with OctoPrint. Note that installation of Klipper comes in part #3 and that the photographs shows my test setup, not the final wiring. I am using an Pi 3B, that I already had. While the speed of the Arduino does not matter that much, the speed of the Pi does. This is where I will run OctoPrint, Klipper, camera, interesting plugins and other stuff, so the faster the merrier. If I was buying new I might go for an upper end Orange Pi or at least an Pi 3B+. The Pi and the Arduinoes does not need more than 2A, even if they also power some sensors, fans, and the like. I am however using an 5V 7A power supply I had lying around. I am powering the Pi through the GPIO pins 2 and 6 - that is fine in a configuration like this and with any fairly decent power supply. Installation of OctoPrint is very simple by just following ...

Starting with a big package

Image
My CEVO printer is largely based on the HyperCube HEVO design. That made it an obvious choice to get a lot of part in one go from what is known as "Lin's BOM", which is an Aliexpress store , where you can adapt a standard BOM to your own wishes. Well, my package from Lin has arrived, and I can slowly start the build. I will get quite a lot of parts from other sources and this is after all not a HEVO but a CEVO ;-). TODO: add my own BOM here...

Electronics #1: Overall design

Image
This is part #1 in a list of postings on the electronics of my CEVO. The full list can be found here . The topic of this list is overall design and a bit about power management. I am basically a software guy, so my choices are probably more driven by the software/firmware side than by the hardware side. Also, I like to think in modules you can add together, but I am not really much for soldering. This, I think, have been quite influential in my choices. A common choice for HEVO printers is the Duet WiFi , which is definitely very nice, but is also a monolithic and bit expensive solution where you are bound to a specific firmware choice. I am instead starting with choosing Klipper accompanied by OctoPrint . I like the approach of Klipper very much and it has good active development. OctoPrint I knows, and even though it is a bit of an ugly hodgepodge it has a lot of interesting plugins, and a generally good approach of how it should be to 3D print. OctoPrint runs on a Raspberry...

Thermal expansion of heated bed

The aluminium bed will expand when heated, and I will have to take that into account when designing the mount for my bed. But how much does it expand? I googled a number of thermal expansion calculators, and somewhat to my surprise they don’t give the same result, although they do give results in the same ballpark. The calculator https://www.omnicalculator.com/physics/thermal-expansion seems well done and well documented. Using that, I get that a 300x300mm plate will expand 0.4mm in width when the temperature rises from 22 degree C to 80 degree C. The change in thickness is so small that it will not matter. Another issue is that the bed may warp. Obviously a thinner bed will warp more easily, and as I understand it, a rolled aluminum sheet will warp more than a cast sheet. The very best is therefor a thick cast aluminum sheet. I will have to take this into account when designing my bed mount. However, it also makes me think that it might not be so good an idea to print first lay...

Rails and movement

The HEVO uses lead screws and steel rods for Z-movement and steel rods and belts for X- and Y-movement. A lot of experimentation are going on of using flat linear rails with bearing blocks and also some on using V-slots and wheels. This in some ways seems the way to go, but it does not (yet) seem clear to me which parts to choose in that direction, and I will stick with screws, rods and belts for the first iteration of my CEVO printer. I will however look into using carbon tubes instead of steel rods, and will also try a somewhat different configuration of both Z and X/Y.

Outer frame

Image
Most CoreXY have a square outer frame, and I am using the HEVO design. I am using the 300x300x300 design from the configurator  but with an extra height of 100mm, so I can keep the electronics at the bottom. My plan is to use a thick MDF plate at the bottom, both for mounting the electronics and for adding weight and rigidity to the frame. Also, I will lower the top front bar, just to get a different look (an idea I got from somewhere I forgot). The precise measures of the 3030 extrusions are made to fit a 300x300mm build plate with the standard mounting parts. I will probably not use the standard parts, but will just choose or design parts so the fit with the standard frame and build plate. This fixes at least some variables, and allowed me to get an (almost) standard frame kit. more info will come here as I start the actual build...